
You Asked For It...
 I've listened to all of your comments from yesterday's Nuggets, and so many of you said that you wanted to learn more about Prismacolor Pencils, Gamsol, and Stumps.
Gamsol (picture of the container that I purchased is to the right) is the blending medium usually used with the pencils. It is odorless mineral spirits. (I'm not sure if regular mineral spirits would work? If someone knows that answer, let me know!) I purchased one of those pump bottles that nail techs use to produce a "puddle" of the Gamsol in a little "well" when the top of the pump is pushed. I think that this works best for me. I bought mine at a local place, called Craft Depot, though I'm sure it can be found at most art stores.
The Gamsol is "applied" or used with Stumps. These are sort of like paper pencils. They are densely wrapped "sticks" that can be sharpened with sand paper, or an emery board. With the Gamsol and the friction of the "rubbing", the stump breaks down the wax in the pencil, and allows you to easily blend colors. They come in a variety of sizes, and are sold at craft stores like Michael's.
*******
Now enough of that pseudo-scientific stuff! The very top picture shows how I almost always start out for a project like this. I have my stamped image, Prismas, Mug-o-Stumps, bottle of Gamsol, and the patterned paper that I want to match the image up to.
The third pic shows what I do first. I outline the image with all of the colors that I "think" I want to use, making sure to pay particular attention to the "shade marks". On this particular image, they used little dots and lines. I make sure that the color is especially dark there.
Next thing I do is lightly, with the side of my pencil, color in the rest of the image. If you make the marks too dark, they are sometimes difficult to blend. I said above the colors I "think" I want, because some colors look lighter when they're "gamsoled", and some look darker, so many times I need to adjust accordingly. The beauty of the pencils, though, like I said before, is that the colors blend very nicely.
The next picture shows me, and my finely manicured hands (yeah, right!), using the stumps. Make sure, if you're thinking of taking the plunge with these pencils, that you also grab one of those erasers (Magic Rub) when you're at the store. It's a miracle worker. Not only will it erase mistakes, but it also is a shading tool!
As you can see in the next pic, I'm "recoloring" the yellow. I'm doing this because I wasn't matching closely enough to the yellow in the PP.
Do you see the slight light area in his face? That is supposed to be there. You can either color it that way from the beginning, OR use your eraser to remove the color. THEN reblend it with your stump. The idea is to blend the color in from the outside edges, so that when you get to the center of the image, you have less color, looking like light reflecting off the image - making it more life-like.
The next pic shows the dino fully colored in the yellow areas, but it needs some more shading. Also, it shows the "grass and sky" around the dino. Like "inside" the dino, I paid close attention to where the artist placed the shading marks. (The beauty of a Whipper Snapper stamp! House Mouse stamps are even MORE shade-friendly!) I blended the grass by "pulling" the color from the "foot-line" down till the color runs out. This technique creates an even shade and an elevated "mound". I did the same thing with the blue, pulling it out from the body.
This next picture (we're almost done!) shows the nearly finished product. I colored the orange area (don't know what that thing's called!) and nose, spikes, and nails. I decided to add a bit more shading with a shade darker pencil for both the yellow and orange areas. This just adds more depth. Again, I concentrated on the all of the image lines, and blended.
He's pretty bright, but I think he turned out pretty cute. Keep scrolling down, you're nearly there! :)
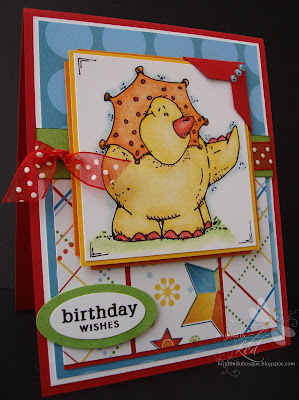
So here it is! The completed card. I hope that I didn't disappoint or bore you to tears with this tutorial! I apologize for the extreme wordiness, but I don't know how to describe the process in any other way! If you have any other questions, regarding the Prismacolor Pencils, please don't hesitate to email me.
[Reposted: This card was published in the Nov. issue of Cards, pg.165.]
Have a super great Hump Day, and I'll see you tomorrow!
xox,
k
**********
ETA: A couple of people had some good questions that I wanted to address - I knew I'd forget something! lol First, YES Stampin' Up! Whisper White is what I use for this technique, NOT Watercolor Paper. I tried that on an earlier card, and I really had to "scrub" the colors to blend them. (Thanks, Leslie!)
Also, I use the Palette Noir ink for this, rather than the Stazon, because the Gamsol will make the Stazon bleed. Basic Black should work okay, too, though.
And lastly, the dragonfly is one of my tattoos. (Blushing.) There were a few of you who got it right! But the several comments about it being a metaphor for me in my crafting journey, etc... really made me smile! ;) I'm kind of sorry that it wasn't more insightful than that, now! LOL (Thanks for reminding me, Heather!)
Fine Print...
Stamps - Whipper Snapper, Papertrey; CS - Red, WW, Sun, Pumpkin, Galore (sponged with Olive to better match the paper); Ticket Corner punch; May Arts ribbon; SU! Oval Punches; Imaginisce PP; Twinkle Stickers; and of course, Prismacolor Pencils, Stumps, Gamsol
![]()


This is a gorgeous card! The image is just so cute. I can't wait till I can get my own Whipper Snappers. As usual you do a great job with the layering, you always have interesting and unique ways of presenting your images!
ReplyDeleteThanks for taking the time to show how you do such a great job of coloring. Love your blog BTW.
ReplyDeleteThanks for the tutorial on using the prismacolor pencils. I now feel confident to try this technique. Absolutely love your Blog!
ReplyDeletePat
I loved this tutorial and find it very helpful. I do have a few questions. You say you use the stumps with the gamasol, do you dip the stump into the gamasol before you apply it to the paper? Also, is this the same or similar way you color when say, watercoloring? I mean as for adding color and blending, and shading? Your card is beautiful,as always. You really are a talented artist!
ReplyDeleteThank you, Lisa! And yes, you dip the stump into the Gamsol before applying to the paper. Watercoloring is very similar, but I'm planning a tutorial on that soon!
ReplyDeleteI'm glad your going to do watercoloring also. I have primsacolor watercolor pencils - looking forward to that. I returned my pencils but going to have to re-think this one since you gave such a wonderful tuturiol. You weren't too long - valuable information, I learned alot. Your work is amazing. We don't have Gamsol will any mineral spirit work?
ReplyDeleteThis card is great, thanks for taking the time to show us novices how to do it. Received my pencils a couple of weeks ago and have been flubbing with them since. Now I know how to do it right.
ReplyDeleteThis is a great tutorial!! Your pictures are wonderful and the card is just delightful :)
ReplyDeletewhat a great tutorial Kirsten! This card is just TDF!
ReplyDeleteI thoroughly enjoyed this tuturial, and as usual, your final product is just perfect! Thanks for taking the time to help us all with this technique!
ReplyDeleteWhat an AWESOME tutorial! Thank you so much!
ReplyDeleteSo cute! Thanks for the tutorial! I just bought the Prisma watercolor pencils this weekend, thinking that's what I was supposed to use. Oh well, now I'll have to save up for the pencils! Thanks again!
ReplyDeleteI LOVE the detail in this card! The colours and image go well together!
ReplyDeleteThank you for the great tutorial! I bought some pencils on ebay and I have to keep playing with them. I think I did alright on my first image but definitely now as good as you!!! Looking forward to the watercoloring tutorial!
ReplyDeleteWhat a cute dino!! Love the card and tutorial! Great job! :)
ReplyDeleteNow that was a tutorial I can see and understand! I've got the "stuff," now I've gotta put it to use. Thank you so much for the time and effort you put into this tutorial. It's great!
ReplyDeleteKaren
WONDERFUL tutorial and beautiful card!!! Thank you so much for sharing this!!!
ReplyDeleteWhat a wonderful tutorial Kirsten, well done! I already use & love Prismacolors & gamsol, but I certainly learned some new tricks from you. And your finished card is super cute! I love how bright & fun it is. Great job all around!!
ReplyDeleteThanks for a wonderful tutorial!! Your card is so dang cute! Perfect coloring and combination of papers, and well....everything!
ReplyDeleteThank you so much for doing that tutorial. I never knew what the "stumps" were or where to find them, now I do!
ReplyDeleteThank you! I know we have emailed about primsacolors vs watercolors and I have been so close to getting several times, but was scared because I did not feel I knew enough about the technique. They are on my wishlist now!! And the card turned out great! I love the pp you use too and it was interesting seeing your process with the papers layed out first. Thanks so much! Heather
ReplyDeleteThis is an awesome tutorial, Kirsten, and an incredibly cute card! Love your mix of colors with the patterned papers. Thanks so much for all the great instructions and pictures. I might have to give Gamsol another try. I heard it works best with a really smooth paper. I think that's maybe where I went wrong the one and only time I tried it. Your Gamsol colored images always look so fantastic!
ReplyDeleteThis is awesome!! I have never used gamasol. I am going to have to buy some now that I know how to use it!! You rock girl..oh and adorable card!!
ReplyDeletewhat a great tutorial, i've always wanted to learn how to color in a card. Now i have to go out and get those stumps, the gamisol and the prisma colors. love love love your blog! TFS!
ReplyDeletethe card is great. Love the whipper snapper images The tutorial was awesome!
ReplyDeleteHi Kirsten! First off...the card ROCKS! Super cute! And I can't thank you enough for the tutorial! I did not find it wordy at all! Very informative and easy to follow. Nicely done! Thanks, thanks, thanks!
ReplyDelete=) I hope you're having a creative day!
I thought of another question about the process...sorry! You said that you start with a big mug of stumps. I know they come in different sizes, so it makes sense you would need different sizes depending on the size of the space you are coloring --- however do you need to change stumps depending on the color you are using or do you need to file the stumps between using different colors?
ReplyDeleteOh --- cool about the tatoo! I am not brave enough to have one, but I think it is on my list of things to do in my lifetime!
ReplyDeleteI am going to have to invest in some of these pencils (you'd think that as a prior art major that I would have some...but that was in a different life!!) Your coloring is wonderful!!
ReplyDeleteStarla (star)
I really love this adorable card! the colors are bright and cheery! To answer the question about Gamsol....I don't think anyone else did....you can use regular mineral spirits! It works just fine!
ReplyDeleteTo answer you Heather, I generally dedicate a stump to a color (blues, greens, etc...), but they can be cleaned out like a blender pen with the Gamsol. I only file them to sharpen the points.
ReplyDeleteBTW, do you have a blog, because you ask so many good questions, and leave so many sweet comments, I'd like to answer you directly!
Hugs to you!
This tutorial is terrific - thank you so much! I'm trying to stretch myself and try more techniques, so I'm ready to go with this one! Your finished card is eye-popping awesome!!! :)
ReplyDeleteAwesome tutorial. You put so much detail into everything - and this shows just how much! thanks for sharing. xoxo
ReplyDeleteThis is a great tutorial. I like that you really talk your way though it. Lots of information provided.
ReplyDeleteThank you for the awesome tutorial Kristen! Can't wait to try this technique....Got to go tu buy some Gamsol.... (wink)
ReplyDeleteagain, TFS
Awesome tutorial. Wonderful instructions. The card is so adorable. Great job!
ReplyDeleteVery cute! Is Gamsol better than other odorless mineral spirits or are they all similar? Will they work with any colored pencils or just PrismaColor?
ReplyDeleteThis is the most awesome tutorials I have ever seen! I have been so curious about how you do your coloring, but sometimes when I ask people how they do things they don't reply so I decided not to ask. Your gamsol/prismacolor cards are so amazing!
ReplyDeleteThank you for the tutorial. Great looking card!
ReplyDeletegreat tutorial! i have the pencils still brand new and just need the gamsol and stumps! guess i'm having too much fun with my prismacolor markers that i need to put them down and give the pencils some love, too!
ReplyDeleteTHANK YOU, THANK YOU, THANK YOU for sharing this thorough and easy-to-follow tutorial on Prismacolor pencils. NOW I WANT SOME! The depth and richness of colors doesn't really compare to regular blender pens. THANK YOU!
ReplyDeleteWhat a great tutorial. You are inspiring me to use this tech., which I have not done for ages. Love your really cute and colorful card too. TFS
ReplyDeleteGreat tutorial, Kirsten! Not too wordy at all. I linked to your blog from Leslie Miller's. I have done the Gamsol technique a few times, but I really need practice. Your darling card and thorough tutorial has inspired me to pull out my pencils.
ReplyDeleteAlso, I was at my local Dick Blick a few weeks ago and they had free 1 oz. samples of Gamsol. Perfect if you want to try the technique without investing much. Buy a few pencils and check it out!
❤¸¸.•*¨*•♫♪♥T♥H♥A♥N♥K♥S♥♪♫•.❤¸¸.•*¨*•♫♪♥
ReplyDelete♥Lovely GG♥